PowerShell GUI for your scripts. Episode 4

Check Boxes

Creating the check box:

$procName = New-Object System.Windows.Forms.checkbox #create the check box
$procName.Location = New-Object System.Drawing.Size(10,20) #location of the check box in relation to the group box's edges (length, height)
$procName.Size = New-Object System.Drawing.Size(100,20) #the size in px of the check box (length, height)
$procName.Checked = $true #check box is checked by default
$procName.Text = "Type" #labeling the check box
$groupBox.Controls.Add($procName) #activate the inside the group box

Note: I’ve added the check box object to a group box item as I did with the radio buttons in Episode 3. However, this is not quite as important since check boxes act independently of each other. Feel free to add it to the form instead if you prefer.

Creating the function:

function procInformation {

$wks = $DropDownBox.SelectedItem.ToString()

try {
$prcInfo = gwmi win32_processor -computer $wks -ErrorAction STOP

if ($procName.Checked -eq $true) {$Name = "Proc type: $($prcInfo.Name)"}
if ($procLoad.Checked -eq $true) {$Load = "Proc load: $($prcInfo.LoadPercentage) %"}
if ($procSpeed.Checked -eq $true) {$Freq = "Proc frequency: $($prcInfo.CurrentClockSpeed) MHz"}

$outputBox.text = "$Name `n$Load `n$Freq" 

       } #end try

catch {$outputBox.text = "`nOperation could not be completed"}

                           } # end procInformation

Note: you will notice I’ve added -ErrorAction STOP. I did this so gwmi errors become termination errors and can be handled by try/catch.

Full script:

Code here:

[void] [System.Reflection.Assembly]::LoadWithPartialName("System.Drawing") 
[void] [System.Reflection.Assembly]::LoadWithPartialName("System.Windows.Forms")  

$Form = New-Object System.Windows.Forms.Form    
$Form.Size = New-Object System.Drawing.Size(600,400)  

############################################## Start functions

function procInformation {

$wks = $DropDownBox.SelectedItem.ToString()

try {
$prcInfo = gwmi win32_processor -computer $wks -ErrorAction STOP

if ($procName.Checked -eq $true) {$Name = "Proc type: $($prcInfo.Name)"}
if ($procLoad.Checked -eq $true) {$Load = "Proc load: $($prcInfo.LoadPercentage) %"}
if ($procSpeed.Checked -eq $true) {$Freq = "Proc frequency: $($prcInfo.CurrentClockSpeed) MHz"}

$outputBox.text = "$Name `n$Load `n$Freq" 

       } #end try

catch {$outputBox.text = "`nOperation could not be completed"}

                           } # end procInformation                  

############################################## end functions

############################################## Start group boxes

$groupBox = New-Object System.Windows.Forms.GroupBox
$groupBox.Location = New-Object System.Drawing.Size(250,20) 
$groupBox.size = New-Object System.Drawing.Size(130,100) 
$groupBox.text = "Processor Info:" 
$Form.Controls.Add($groupBox) 

############################################## end group boxes

############################################## Start check boxes

$procName = New-Object System.Windows.Forms.checkbox
$procName.Location = New-Object System.Drawing.Size(10,20)
$procName.Size = New-Object System.Drawing.Size(100,20)
$procName.Checked = $true
$procName.Text = "Type"
$groupBox.Controls.Add($procName)

$procLoad = New-Object System.Windows.Forms.checkbox
$procLoad.Location = New-Object System.Drawing.Size(10,40)
$procLoad.Size = New-Object System.Drawing.Size(100,20)
$procLoad.Text = "Load"
$groupBox.Controls.Add($procLoad)

$procSpeed = New-Object System.Windows.Forms.checkbox
$procSpeed.Location = New-Object System.Drawing.Size(10,60)
$procSpeed.Size = New-Object System.Drawing.Size(100,20)
$procSpeed.Text = "Frequency"
$groupBox.Controls.Add($procSpeed)

############################################## end check boxes

############################################## Start drop down boxes

$DropDownBox = New-Object System.Windows.Forms.ComboBox
$DropDownBox.Location = New-Object System.Drawing.Size(20,50) 
$DropDownBox.Size = New-Object System.Drawing.Size(180,20) 
$DropDownBox.DropDownHeight = 200 
$Form.Controls.Add($DropDownBox) 

$wksList=@("hrcomputer1","hrcomputer2","hrcomputer3","workstation1","workstation2","computer5","localhost")

foreach ($wks in $wksList) {
                      $DropDownBox.Items.Add($wks)
                              } #end foreach

############################################## end drop down boxes

############################################## Start text fields

$outputBox = New-Object System.Windows.Forms.RichTextBox 
$outputBox.Location = New-Object System.Drawing.Size(10,150) 
$outputBox.Size = New-Object System.Drawing.Size(565,200) 
$outputBox.MultiLine = $True 

$outputBox.ScrollBars = "Vertical" 
$Form.Controls.Add($outputBox) 

############################################## end text fields

############################################## Start buttons

$Button = New-Object System.Windows.Forms.Button 
$Button.Location = New-Object System.Drawing.Size(400,30) 
$Button.Size = New-Object System.Drawing.Size(110,80) 
$Button.Text = "Get Processor Info" 
$Button.Add_Click({procInformation}) 
$Form.Controls.Add($Button) 

############################################## end buttons

$Form.Add_Shown({$Form.Activate()})
[void] $Form.ShowDialog()

Final result should look like this:

powershell_check_box

powershell_check_box2

Foreach vs Cursor

So what if we have a list and we want to go through it an item at a time?

For fun let’s do this first in PowerShell and then replicate the results using a T-SQL cursor.

Powershell – Foreach

Code:

$GetColor = @("Blue","White","Red","Cyan","Yellow") 

foreach ($ColorProperty in $GetColor) {                            

                                write-host $ColorProperty

                                       } #end foreach

Output:

Blue
White
Red
Cyan
Yellow

T-SQL – Cursor

This being sql, let’s start with a database:

database

table

Code:

declare @ColorProperty char(10)
declare @GetColor cursor

set @GetColor = cursor for select Color FROM test_db1.dbo.table1

open @GetColor
fetch next from @GetColor into @ColorProperty

while @@FETCH_STATUS = 0
Begin

Print @ColorProperty
fetch next from @GetColor into @ColorProperty

End

close @GetColor
deallocate @GetColor

Output:

Blue      
White     
Red       
Cyan      
Yellow

Recovering deleted Active Directory Objects – Tombstone reanimation

To start off, sorry to disappoint, no zombie jokes here just routine AD stuff 😉

When deleting an object, Active Directory will not actually delete that object immediately (in most cases) but rather it will keep it for a period of time as a tombstone object. This means it will remove some of its attributes, add the isDeleted=True attribute, and place the object in the Deleted Object container.

The tombstone objects do have a limited life however; they will be removed after a certain amount of time by the AD garbage collection process.

The life of the tombstone objects is determined here (nr. of days):

Configuration namespace > Services > Windows NT > Directory Service > tombstoneLifetime:

tobstone_lifetime

To start we need to play attention to the object’s systemFlags attribute (This is an optional attribute of the TOP class). The systemFlags will determine what we can “tell” AD to do with an object.

Let’s take two of its possible values for example:

33554432 (0x02000000) The object is not moved to the Deleted Objects container when it is deleted. It will be deleted immediately.
2147483648 (0x80000000) The object cannot be deleted.

If the object’s systemFlags attribute is NOT 0, verify here what its constraints are applied to the object  http://msdn.microsoft.com/en-us/library/windows/desktop/ms680022%28v=vs.85%29.aspx

Next we need to focus on what attributes will be kept (and therefore recoverable) when the object is tombstoned. This is controlled by the attribute’s searchFlags.

If the searchFlags’ bit 3 is 0 then the attribute is will be discarded, if it’s 1 the the attribute is kept (00001000 = keep; 00000000 = delete)

Let’s take a look at two attributes in the schema partition:

Object-Sid:

The searchFlags’ decimal value is 9, if we translate this in binary 00001001 so the attribute will be kept when the object is tombstoned.

objectSid_searchFlags

Surname:

The searchFlags’ decimal value is 5, if we translate this in binary 00000101 so the attribute will not be kept when the object is tombstoned.

surname_searchFlags

Note. I will cover in a future article how to change the searchFlags attribute in order to keep it in the tombstone

———————————————

———————————————

Let’s recover an object (of course use your own domain naming convention)

Start Ldp.exe

Connect > domain1.com

Bind > enter your credentials

Before we do anything else we must enable ldp.exe to show the deleted objects:

Options > Controls > Load Predefined > Return deleted objects > OK

Should look like this:

ldp_view_del_items

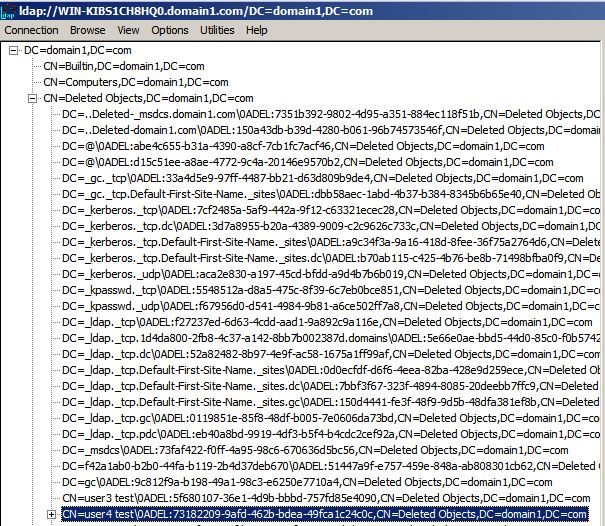
The deleted objects can be found either using tree view

View > Tree > BaseDN “DC=domain1, DC=com”

Navigate to “CN=Deleted Objects,DC=domain1, DC=com” and expand

ldp_tree_view

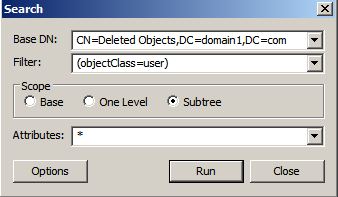
or using the search option

Browse > Search

ldp_search

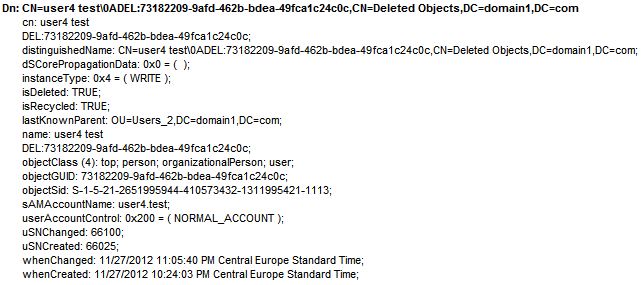
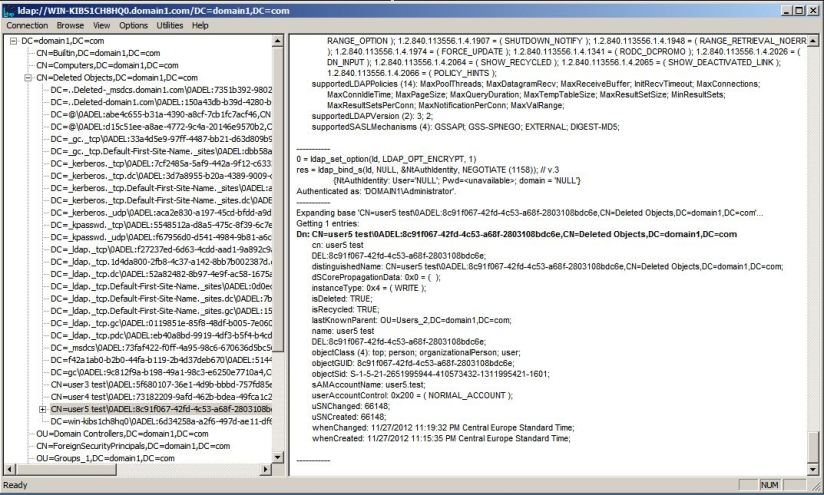
Earlier I deleted user4.test. Let’s take a closer look at the tombstone:

tobstoned_object

First of all we see that the object’s DN now incorporates its GUID. The Deleted Objects is a flat container so this is done in order to prevent overlap in case another object with the same name gets deleted.

Of particular interest is the lastKnownParent attribute. Its value tells us the object’s previous location so it’s very useful if we want to restore it in the same OU.

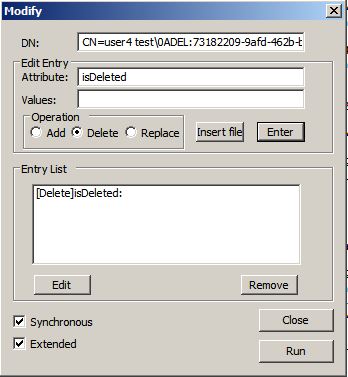
We right-click the object we want to restore and select Modify.

Select Operation Delete.

Write in the Attribute field: isDeleted

Hit enter

Do not hit RUN yet!

delete_isDeleted

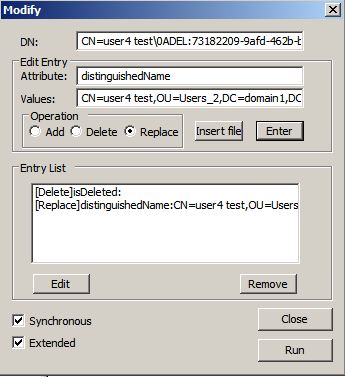
Select Operation Replace

Write in the Attribute field: distinguishedName

Write in the Value field: the future DN of the object

(I often just combine the object’s previous CN with value of lastKnownParent if you want to restore in the object’s previous location)

Hit Enter

Final result should look like this:
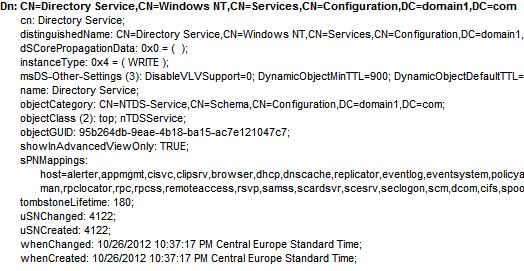
modify_DN

Hit RUN

The object is restored!

Samba 4 released: The First Open Source Active Directory Compatible Server

This is huge! No other way of saying it.

An open source Active Directory implementation fully compatible nonetheless with Microsoft’s own solution is a game changer!

Here is the link to the announcement (their servers are getting hammered as of this posting):

https://www.samba.org/samba/news/releases/4.0.0.html

some quote’s so you can get an idea:

" LDAP directory server, Heimdal Kerberos authentication server, a secure Dynamic DNS server, 
and implementations of all necessary remote procedure calls for Active Directory. Samba 4.0
provides everything needed to serve as an Active Directory Compatible Domain Controller for
all versions of Microsoft Windows clients currently supported by Microsoft, including the 
recently released Windows 8."

"support for features such as Group Policy, Roaming Profiles, Windows Administration tools
and integrates with Microsoft Exchange"

"The Samba 4.0 Active Directory Compatible Server can also be joined to an existing Microsoft
Active Directory domain, and Microsoft Active Directory Domain Controllers can be joined to a
Samba 4.0 Active Directory Compatible Server"

I would also like to say: Big props to the Microsoft engineers who helped the Samba team bring this!

Time to fire up some virtual machines! 🙂

PowerShell GUI for your scripts. Episode 3

Group Boxes | Radio Buttons

Group boxes allow you to … well … group visual elements together.  In particular, they allow multiple sets of radio buttons.

Creating the Group Box

$groupBox = New-Object System.Windows.Forms.GroupBox #create the group box
$groupBox.Location = New-Object System.Drawing.Size(270,20) #location of the group box (px) in relation to the primary window's edges (length, height)
$groupBox.size = New-Object System.Drawing.Size(100,100) #the size in px of the group box (length, height)
$groupBox.text = "Nr of pings:" #labeling the box
$Form.Controls.Add($groupBox) #activate the group box

Creating the radio buttons

$RadioButton1 = New-Object System.Windows.Forms.RadioButton #create the radio button
$RadioButton1.Location = new-object System.Drawing.Point(15,15) #location of the radio button(px) in relation to the group box's edges (length, height)
$RadioButton1.size = New-Object System.Drawing.Size(80,20) #the size in px of the radio button (length, height)
$RadioButton1.Checked = $true #is checked by default
$RadioButton1.Text = "Ping once" #labeling the radio button
$groupBox.Controls.Add($RadioButton1) #activate the inside the group box

Note.  Notice that I added the radio button to the group box and not the form. Two reasons:

  1. Grouping the radio buttons together
  2. By placing radio buttons groups in separate group boxes they can function independently from each other

Note2. Only one radio button per group can be .Checked = $true

Adding to the ping function based on the radio selection

if ($RadioButton1.Checked -eq $true) {$nrOfPings=1} 
if ($RadioButton2.Checked -eq $true) {$nrOfPings=2}
if ($RadioButton3.Checked -eq $true) {$nrOfPings=3}
$pingResult=ping $wks -n $nrOfPings

If you would rather initiate an action upon a radio button selection use the method:

.Add_Click({functionName})

Now for the completed script (adding where we left in Episode 2):

[void] [System.Reflection.Assembly]::LoadWithPartialName("System.Drawing") 
[void] [System.Reflection.Assembly]::LoadWithPartialName("System.Windows.Forms")  

$Form = New-Object System.Windows.Forms.Form    
$Form.Size = New-Object System.Drawing.Size(600,400)  

############################################## Start functions

function pingInfo {

if ($RadioButton1.Checked -eq $true) {$nrOfPings=1}
if ($RadioButton2.Checked -eq $true) {$nrOfPings=2}
if ($RadioButton3.Checked -eq $true) {$nrOfPings=3}

$computer=$DropDownBox.SelectedItem.ToString() #populate the var with the value you selected
$pingResult=ping $wks -n $nrOfPings | fl | out-string;
$outputBox.text=$pingResult

                     } #end pingInfo

############################################## end functions

############################################## Start group boxes

$groupBox = New-Object System.Windows.Forms.GroupBox
$groupBox.Location = New-Object System.Drawing.Size(270,20) 
$groupBox.size = New-Object System.Drawing.Size(100,100) 
$groupBox.text = "Nr of pings:" 
$Form.Controls.Add($groupBox) 

############################################## end group boxes

############################################## Start radio buttons

$RadioButton1 = New-Object System.Windows.Forms.RadioButton 
$RadioButton1.Location = new-object System.Drawing.Point(15,15) 
$RadioButton1.size = New-Object System.Drawing.Size(80,20) 
$RadioButton1.Checked = $true 
$RadioButton1.Text = "Ping once" 
$groupBox.Controls.Add($RadioButton1) 

$RadioButton2 = New-Object System.Windows.Forms.RadioButton
$RadioButton2.Location = new-object System.Drawing.Point(15,45)
$RadioButton2.size = New-Object System.Drawing.Size(80,20)
$RadioButton2.Text = "Ping twice"
$groupBox.Controls.Add($RadioButton2)

$RadioButton3 = New-Object System.Windows.Forms.RadioButton
$RadioButton3.Location = new-object System.Drawing.Point(15,75)
$RadioButton3.size = New-Object System.Drawing.Size(80,20)
$RadioButton3.Text = "Ping thrice"
$groupBox.Controls.Add($RadioButton3)

############################################## end radio buttons

############################################## Start drop down boxes

$DropDownBox = New-Object System.Windows.Forms.ComboBox
$DropDownBox.Location = New-Object System.Drawing.Size(20,50) 
$DropDownBox.Size = New-Object System.Drawing.Size(180,20) 
$DropDownBox.DropDownHeight = 200 
$Form.Controls.Add($DropDownBox) 

$wksList=@("hrcomputer1","hrcomputer2","hrcomputer3","workstation1","workstation2","computer5","localhost")

foreach ($wks in $wksList) {
                      $DropDownBox.Items.Add($wks)
                              } #end foreach

############################################## end drop down boxes

############################################## Start text fields

$outputBox = New-Object System.Windows.Forms.TextBox 
$outputBox.Location = New-Object System.Drawing.Size(10,150) 
$outputBox.Size = New-Object System.Drawing.Size(565,200) 
$outputBox.MultiLine = $True 

$outputBox.ScrollBars = "Vertical" 
$Form.Controls.Add($outputBox) 

############################################## end text fields

############################################## Start buttons

$Button = New-Object System.Windows.Forms.Button 
$Button.Location = New-Object System.Drawing.Size(400,30) 
$Button.Size = New-Object System.Drawing.Size(110,80) 
$Button.Text = "Ping" 
$Button.Add_Click({pingInfo}) 
$Form.Controls.Add($Button) 

############################################## end buttons

$Form.Add_Shown({$Form.Activate()})
[void] $Form.ShowDialog()

Final result should look like this (choose the number of pings you want performed)

powershell_GUI_radio_ping

Ping away! 🙂

Time synchronization in Active Directory – PDC configuration

Blog entry under construction

Clock synchronization hierarchy in Active directory:

Local Workstation > Domain Controller > Child Domain PDC > Forest Root PDC

Screenshot from my lab:

w32tm /monitor

w32tm_monitor_local

We can see that the DC2-2008 domain controller synchronizes with the PDC emulator as it should.

The problem is that in a default installation, the forest root PDC synchronizes the clock with itself RefID: ‘LOCL’

The solution is to sync the forest root PDC with one or more NTP servers.

Option 1 – sync directly with an internet time server

Option 2 – sync with a dedicated time server on your internal network (Microsoft recommendation to avoid linking a PDC to a internet server)

For the purpose of this article we’ll use a self built Linux NTP server. To create your own :

https://sysadminemporium.wordpress.com/2012/12/03/installing-and-configuring-a-linux-ntp-server/

———————————

Configuring the root PDC emulator

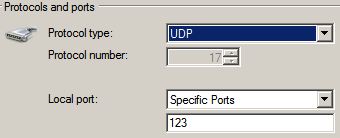
Add an inbound firewall exception to the PDC server for UDP 123.

Windows Firewall with Advanced Security > Inbound Rules > New Rule > Port

firewall_udp123

Configure the PDC to switch to NTP updates:

w32tm /config /syncfromflags:manual /manualpeerlist:”NTPserver1 NTPserver2” /reliable:yes /update

set_ntp_source

Note. manual peer list can contain a list of servers (local or internet) for time synchronization. Separate server names with spaces.

Initiate a resync

w32tm /resync

Final result should look like this:

w32tm_monitor_ntp

Notice the difference with the first picture! The RefID now shows the NTP server used for sync.

————————–

PS Registry modifications and fine tuning:

Modified registry keys:

HKEY_LOCAL_MACHINE\SYSTEM\CurrentControlSet\Services\W32Time
Parameters\Type=NTP
Parameters\NtpServer="name of the NTP server(s)"
Config\AnnounceFlags=5
TimeProviders\NtpServer\Enabled=1

You can also do a lot of fine tuning in the regstry. For example

Config\MaxPosPhaseCorrection=172800
 Config\MaxNegPhaseCorrection=172800

Changing their values will alter the maximum allowable clock correction

For more details please visit:
http://blogs.msdn.com/b/w32time/archive/2009/02/02/group-policy-settings-explained.aspx

Installing and configuring a Linux NTP server

Blog entry under construction

Configure your own internal dedicated NTP server

This article can be standalone (Part 1) or as a precursor to my other Active directory time sync article (Part 2):

https://sysadminemporium.wordpress.com/2012/12/03/time-synchronization-in-active-directory-pdc-configuration/

For our purposes we’ll be using Ubuntu server.  I’ll be using 12.04  (LTS)  http://www.ubuntu.com/download/server

The tutorial should apply to most Debian based distributions. Other Linux distros should have very similar configuration setting might use a different package management than apt-get and not have sudo configured.

—————————-

Part  1. Install and configure the NTP server:

First we remove the ntpdate

sudo apt-get remove ntpdate

Then we install the NTP server

sudo apt-get install ntp

Next we need to very that it works:

ntpq -p

ntpq-p

and verify that the date and time are correct:

date

date

And this is it. 🙂

If you would like to play with more settings, here are some things you could change:

Remember to restart the server after any configuration changes so they can take effect:

sudo /etc/init.d/ntp restart

ntp_restart

Changing the upstream NTP servers to get updates from:

sudo nano /etc/ntp.conf

We can leave the default server list or we can comment/remove them and replace with whatever servers we prefer. For this example I choose two at random from this list: http://tf.nist.gov/tf-cgi/servers.cgi. (I found the default canonical provided server pools to be quite reliable so you can leave this setting alone)

ntp_server_config

Note. For lower latency google some local NTP server pools 🙂

Note 2. Adding iBurst to a server or more should speed up the initial synchronization with it.

NTP access

sudo nano /etc/ntp.conf

You can let the defaults stand:

ntp_time_share

If you would like a comprehensive guide to restrictions use this guide:

http://support.ntp.org/bin/view/Support/AccessRestrictions

—————————

Part 2.  Preparing system to act as NTP server for Active Directory

For the lab purposes let’s give it two NICs: one facing internet using DHCP eth0 and one facing the internal network with a static configuration eth1 (adapt the settings according to your topology and security)

Edit the network configuration:

sudo nano /etc/network/interfaces

to look like this (223.50.11.0 is the internal subnet used by the PDC):

nano_interfaces

restart:

sudo /etc/init.d/networking restart

Final result:

ifconfig_final

As we can see we gave the NTP server the 223.50.11.1 IP to use in the internal network (same one used by the forest root PDC).

Let’s make a DNS entry for it then:

dns_ntp

You can follow the rest:

https://sysadminemporium.wordpress.com/2012/12/03/time-synchronization-in-active-directory-pdc-configuration/

Tracking who deleted an Active Directory account

Someone just deleted a very important AD account. Your job, should you choose to accept it, is to track down the vile perpetrator and enact swift justice!  😉

Account name: user5.test

Location: domain1.com

Tools for the job: ldp.exe; repadmin; event-log

Note. This is done with 2008R2 DC servers, Forest functional level 2003 / Domain Functional level 2003.  If you run server 2003 the event log numbers will be most likely different.

Step 1. ldp.exe

Acquire the deleted object’s DN.

The object’s old DN is not valid anymore, what we need is the new tombstone DN (a bit special since it includes the GUID to insure uniqueness)

Start Ldp.exe

Connect > domain1.com

Bind > appropriate credentials

Before we do anything else we must enable ldp.exe to show the deleted objects:

Options > Controls > Load Predefined > Return deleted objects > OK

Should look like this:

ldp_view_del_items

View > Tree > BaseDN “DC=domain1, DC=com”

Navigate to “CN=Deleted Objects,DC=domain1, DC=com” and expand

Note. Replace domain1.com with your own naming convention of course 😉

Locate user5 test and grab the tombstone DN ( object’s old GUID + old DN)

Note. I will provide in a later article the details on managing and recovering tombstone objects, and further details about ldp.exe (amazing AD admin tool)

Step 2. repadmin

Find out on what DC the object was deleted.

repadmin /showobjmeta DCname “DN”

Note. Mare sure the DC used has replicated, and use the deleted object’s tombstone DN we grabbed in Step 1.

Aha! What do we see here? The isDeleted attribute originated on the DC2-2008 domain controller:

Note: More details on this function can be found here: https://sysadminemporium.wordpress.com/2012/11/22/hello-world/

Step 3. event-log

Accessing the DC2-2008’s event-log

Windows Logs > Security

What do we have here? A 4726 Account management Log!

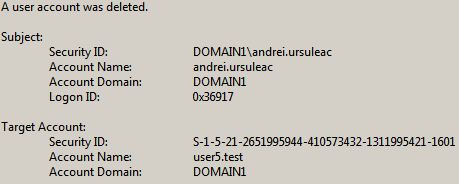
A closer look:

Success! User5.test was deleted by Domain1\andrei.ursuleac

Ugh…that is my account…time to run!

PowerShell GUI for your scripts. Episode 2

DropDown Lists

Why enter the information manually into a text box when we can have a nice dropdown list with a selection ready?

To start off we need an array:

$wksList=@("hrcomputer1","hrcomputer2","hrcomputer3","workstation1","workstation2","computer5")

You can populate the array using an external file, an active directory query or even an SQL query. In this case we hand built an array for simplicity’s sake

Build the drop down list (we’ll replace the InputBox from the Episode 1 script):

$DropDownBox = New-Object System.Windows.Forms.ComboBox #creating the dropdown list
$DropDownBox.Location = New-Object System.Drawing.Size(20,50) #location of the drop down (px) in relation to the primary window's edges (length, height)
$DropDownBox.Size = New-Object System.Drawing.Size(180,20) #the size in px of the drop down box (length, height)
$DropDownBox.DropDownHeight = 200 #the height of the pop out selection box
$Form.Controls.Add($DropDownBox) #activating the drop box inside the primary window

Populate the drop down list from the array we built earlier:

foreach ($wks in $wksList) {
                      $DropDownBox.Items.Add($wks)
                              } #end foreach

Populate a variable (named $computer in this case) with the value you select in the dropdown:

$computer=$DropDownBox.SelectedItem.ToString()

—————————–

Let’s put it all together. We’ll take the GUI ping script from Episode 1 and replace the InputBox with a dropdown list

[void] [System.Reflection.Assembly]::LoadWithPartialName("System.Drawing") 
[void] [System.Reflection.Assembly]::LoadWithPartialName("System.Windows.Forms")  

$Form = New-Object System.Windows.Forms.Form    
$Form.Size = New-Object System.Drawing.Size(600,400)  

############################################## Start functions

function procInfo {
$computer=$DropDownBox.SelectedItem.ToString() #populate the var with the value you selected
$pingResult=ping $computer | fl | out-string;
$outputBox.text=$pingResult
                     } #end procInfo

############################################## end functions

############################################## Start drop down boxes

$DropDownBox = New-Object System.Windows.Forms.ComboBox
$DropDownBox.Location = New-Object System.Drawing.Size(20,50) 
$DropDownBox.Size = New-Object System.Drawing.Size(180,20) 
$DropDownBox.DropDownHeight = 200 
$Form.Controls.Add($DropDownBox) 

$wksList=@("hrcomputer1","hrcomputer2","hrcomputer3","workstation1","workstation2","computer5")

foreach ($wks in $wksList) {
                      $DropDownBox.Items.Add($wks)
                              } #end foreach

############################################## end drop down boxes

############################################## Start text fields

$outputBox = New-Object System.Windows.Forms.TextBox 
$outputBox.Location = New-Object System.Drawing.Size(10,150) 
$outputBox.Size = New-Object System.Drawing.Size(565,200) 
$outputBox.MultiLine = $True 
$outputBox.ScrollBars = "Vertical" 
$Form.Controls.Add($outputBox) 

############################################## end text fields

############################################## Start buttons

$Button = New-Object System.Windows.Forms.Button 
$Button.Location = New-Object System.Drawing.Size(400,30) 
$Button.Size = New-Object System.Drawing.Size(110,80) 
$Button.Text = "Ping" 
$Button.Add_Click({procInfo}) 
$Form.Controls.Add($Button) 

############################################## end buttons

$Form.Add_Shown({$Form.Activate()})
[void] $Form.ShowDialog()

The end result should look like this:

Select a computer name and PING away 🙂

PS might want to add to the array an actual computer name from your network or localhost 😉

PowerShell GUI front end for your scripts. Episode 1

Why? To give your scripts a nice looking interface, to make it user-friendly (can make a script look like an application usable by the other  non IT departments, and last but not least make the script more comfortable to use.

How? Leveraging the power of the .net framework.

—————————————–

Background Window | Single/Multi line Input/Output Box | Action Button

And now let’s get to it:

Part A. Creating the background window:

[void] [System.Reflection.Assembly]::LoadWithPartialName("System.Drawing") 
[void] [System.Reflection.Assembly]::LoadWithPartialName("System.Windows.Forms")  #loading the necessary .net libraries (using void to suppress output)

$Form = New-Object System.Windows.Forms.Form    #creating the form (this will be the "primary" window)
$Form.Size = New-Object System.Drawing.Size(600,400)  #the size in px of the window length, height

$Form.Add_Shown({$Form.Activate()})
[void] $Form.ShowDialog()   #activating the form

Final result should look like this:

—————————————–

Part B. Adding some functional elements:

Creating a single line text box (we’ll use it for input):

$InputBox = New-Object System.Windows.Forms.TextBox #creating the text box
$InputBox.Location = New-Object System.Drawing.Size(20,50) #location of the text box (px) in relation to the primary window's edges (length, height)
$InputBox.Size = New-Object System.Drawing.Size(150,20) #the size in px of the text box (length, height)
$Form.Controls.Add($InputBox) #activating the text box inside the primary window

Creating a multi line text box (we’ll use it for output):

$outputBox = New-Object System.Windows.Forms.TextBox #creating the text box
$outputBox.Location = New-Object System.Drawing.Size(10,150) #location of the text box (px) in relation to the primary window's edges (length, height)
$outputBox.Size = New-Object System.Drawing.Size(565,200) #the size in px of the text box (length, height)
$outputBox.MultiLine = $True #declaring the text box as multi-line
$outputBox.ScrollBars = "Vertical" #adding scroll bars if required
$Form.Controls.Add($outputBox) #activating the text box inside the primary window

Since we have now two fields how about we add an element to generate an action. How about a Button?

$Button = New-Object System.Windows.Forms.Button #create the button
$Button.Location = New-Object System.Drawing.Size(400,30) #location of the button (px) in relation to the primary window's edges (length, height)
$Button.Size = New-Object System.Drawing.Size(110,80) #the size in px of the button (length, height)
$Button.Text = "Action" #labeling the button
$Button.Add_Click({}) #the action triggered by the button
$Form.Controls.Add($Button) #activating the button inside the primary window

All we need now is a script….how about ol’trusty ping :).We’ll make a function of course to keep things nice and proper

function pingInfo {
$wks=$InputBox.text; #we're taking the text from the input box into the variable $wks
$pingResult=ping $wks | fl | out-string;  #ping $wks
$outputBox.text=$pingResult #send the ping results to the output box
                     } #end pingInfo

Next we need to add the function name to the Button’s Add_Click() method

$Button.Add_Click({pingInfo})

—————————————–

Part C. Putting it all together

[void] [System.Reflection.Assembly]::LoadWithPartialName("System.Drawing") 
[void] [System.Reflection.Assembly]::LoadWithPartialName("System.Windows.Forms")  

$Form = New-Object System.Windows.Forms.Form    
$Form.Size = New-Object System.Drawing.Size(600,400)  

############################################## Start functions

function pingInfo {
$wks=$InputBox.text;
$pingResult=ping $wks | fl | out-string;
$outputBox.text=$pingResult
                     } #end pingInfo

############################################## end functions

############################################## Start text fields

$InputBox = New-Object System.Windows.Forms.TextBox 
$InputBox.Location = New-Object System.Drawing.Size(20,50) 
$InputBox.Size = New-Object System.Drawing.Size(150,20) 
$Form.Controls.Add($InputBox) 

$outputBox = New-Object System.Windows.Forms.TextBox 
$outputBox.Location = New-Object System.Drawing.Size(10,150) 
$outputBox.Size = New-Object System.Drawing.Size(565,200) 
$outputBox.MultiLine = $True 
$outputBox.ScrollBars = "Vertical" 
$Form.Controls.Add($outputBox) 

############################################## end text fields

############################################## Start buttons

$Button = New-Object System.Windows.Forms.Button 
$Button.Location = New-Object System.Drawing.Size(400,30) 
$Button.Size = New-Object System.Drawing.Size(110,80) 
$Button.Text = "Ping" 
$Button.Add_Click({pingInfo}) 
$Form.Controls.Add($Button) 

############################################## end buttons

$Form.Add_Shown({$Form.Activate()})
[void] $Form.ShowDialog()

Final result should look like this:
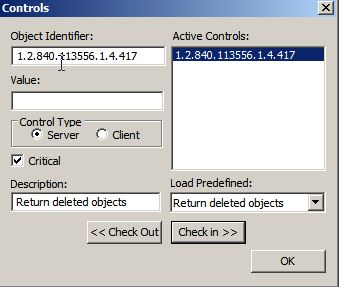
Voilà! Your first script with a graphical interface.

But wait we’re not done. Let’s add some optional BLING! 🙂

—————————————–

Part D. Optional decoration elements

Main window

$Form.StartPosition = "CenterScreen" #loads the window in the center of the screen
$Form.FormBorderStyle = [System.Windows.Forms.FormBorderStyle]::FixedToolWindow #modifies the window border
$Form.Text = "Ping GUI tool" #window description

Modifying the textbox font:

$outputBox.Font = New-Object System.Drawing.Font("Verdana",8,[System.Drawing.FontStyle]::Italic)

Changing the button cursor onHover to a hand icon, the background color to green and a larger font

$Button.Cursor = [System.Windows.Forms.Cursors]::Hand
$Button.BackColor = [System.Drawing.Color]::LightGreen
$Button.Font = New-Object System.Drawing.Font("Verdana",14,[System.Drawing.FontStyle]::Bold)

Those are just some of the customizations possible, integrate some of them in the GUI objects we created, see what they do…change them at will…have FUN!